Although we’re currently living in unprecedented and unpredictable times, class of 2020 grads deserve a glamorous gift for their hard work and dedication that will brighten their day during this difficult time. Give something unique and meaningful that will represent them as they move on to their next chapter. Our jewelry collection for graduation gifts includes initial jewelry and birthstone earrings that will cheer them up, and show them that we will all get through this together.
Flowers are a beautiful sign of affection. All women are delighted when they receive a gorgeous bouquet. Give your loved one a piece of lovely and meaningful floral jewelry and she will smile like a blooming flower.
We have a wide selection of lovely and beautiful flower jewelry, which can give a fresh start to the season. Update your assortment with these elegant pieces, and stock up for Spring today!
For a sumptuous pop of color on your fingers, choose these beautifully designed rings for the summertime! An array of sparkling, multicolored CZs and top-grade crystals achieve a majestic unicorn glow. Rainbow themed jewelry helps to showcase your personality and your individuality and support Pride.
You finally did it. You found web hosting, you bought the perfect domain name, and you have set up your first online store. Even though you designed everything yourself, it looks professionally made.
Great! You got your first customer inquiry. But oh no, you’re still answering emails from your personal Gmail account you set up in 10th grade. Sure, some people might not notice that you’re answering their questions as garfieldfan1992@hotmail.com but then again, you would have noticed. You can probably get “youstorename@gmail.com” and call it a day but it’s still not THAT professional sounding. People are already suspicious about buying from a new online store. A Gmail account might not make people more suspicious but it certainly doesn’t help. To make matters worse, you already bought that perfect domain name for your website, why can’t you just use it? Below we are going to compare some of the top ways to get free email hosting for your custom domain using email forwarding, Zoho, and Yandex.
The typical way… go with Google
But before we get started, let’s just go over what most people do. Google’s G Suite includes productivity apps like Google Docs and Google Drive but also includes a version of Gmail that lets you use your custom domain. Best of all it’s free… if you signed up before 2012.
Given that you’re reading this now, you are probably too late for the free version. At $5 per user, it’s not a terrible price for the convenience of Gmail and the included productivity apps. But then again, these are the same apps you get already get for free as a normal Gmail user. Also, $5 per user per month is not a lot for just one person but might add up if you have a few friends or family that could help out with customer support. Also what if you want an admin@email.com account or a support@email.com or an info@email.com account. While the costs are still small, it could still add up to a few hundred dollars a year for something that FEELS like it should be free. So what are the alternatives?
Email Forwarding
The simplest way to get your custom email domain routed is to use email forwarding. In essence, this isn’t much different than having one mailbox with your domain and just automatically pressing “Forward” to every email that comes in. Since these emails are forwarded, you can actually send all these emails to your existing Gmail account. With the right configuration, you can also, more or less, send emails as your custom domain directly from your Gmail account but it might show up to the receiver with a message saying “sent via gmail.com”. In all, this is a fine solution if a little bit of a “hack”. Many people have used this method for years with no ill effects. You can find detailed instructions on how to do this here.
Pros:
Easy
Can still use Gmail
Can send and receive as your custom domain
Cons:
Kind of a “hack”
Your domain registrar needs to support email forwarding
Some domain registrars might limit the number of forwards
You have to configure Gmail to allow a “less secure apps” mode
People still might receive a message saying that your email was “sent via gmail.com”
Zoho Mail
Zoho is an Indian productivity software company with their US headquarters in California. They are probably most well known for their CRM software that is a more inexpensive alternative to Salesforce. With their bundle of products, they also offer a version of their email services with custom domain support that is free for 5 users. The free option is a little hidden on their website but you can find a link to sign up here.
Much like G Suite, Zoho offers a variety of other free productivity applications when you sign up but most are arguably worse than Google’s offerings. The email client is fine. There is a small learning curve but some features are, in my opinion, easier to use than Gmail, such as group email accounts.
The big downside to the free Zoho Mail account is that there is no SMTP or POP access. This feature is only available in their paid version and this basically means that you will not be able to access Zoho mail from 3rd party apps. They have their own email app for both iPhone and Android which is decent but if you need to have all your emails in your current smartphone app then this might be a dealbreaker.
Pros:
Full email services
Includes suite of free productivity software
Not a hack – won’t have issues with weird sender addresses and forwarding
Cons:
Limited to 5 free accounts
Limited to their smartphone app for free accounts
Yandex
Yandex is essentially the Google of Russia. As such, they offer very similar services, which includes a Gmail equivalent that includes custom domains for free. You can have up to 1000 free email addresses on each domain each with unlimited storage. There are free API integrations (which you probably won’t need, but still nice to know it’s there). Yandex includes SMTP and POP3 access or free which means you can use your preferred smartphone app to receive your emails. If you wanted to, you can even configure your current Gmail to send and receive your email through SMTP and everything will be synced. This syncing means that there would be none of the issues that you would see if using email forwarding.
The only potential problem is that the service is based out of Russia. While it is possible that your data might be more at risk in Russia compared to the US, Yandex is a well-established tech company and is probably well prepared to protect your data against attackers. In terms of privacy, given that many US firms are currently in the middle of data privacy scandals, I can’t say they would be better than an American firm but I also can’t say for sure that they would be worse. In terms of government surveillance, the Russian government certainly does not have a good track record, but personally, I don’t think the Russian government cares my emails nor do I care if they see them. I do not plan on going over there any time soon.
With that said, privacy is not my main problem with Yandex. The biggest problem is that their servers are physically located in Russia. Most internet traffic coming out of Russia is benign but some organizations will mark all internet traffic coming from a certain location as spam and automatically block that traffic. While this is not a good practice and would not happen if you were emailing someone using a major email provider like Google or Yahoo, this might still happen to very cautious and conservative organizations that run their own emails servers. Specific examples that come to mind would be hospitals and government agencies. Even though even among these organizations, this blanket blocking is rare, it can still happen and can be a real headache if it occurs.
Pros:
1000 free email addresses
Unlimited storage
Free productivity apps
Can use your existing smartphone and desktop email apps
Can be synced with your Gmail account
Cons:
Is physically hosted in Russia
Conclusion
So in the end, what should you do? If someone were to ask me, I would tell them to just forget the headache and pay for email from Google or Microsoft (which is a little cheaper at 5 emails for $100 a year). With that said, when I personally set up email for a new domain, I use Zoho. Are all the little annoyances worth $5 a month? To me, yes it is but ultimately, you will have to make that calculation for yourself.
As always, if you have any questions, feel free to write a comment down below and we will get to you as soon as possible!
Amazon is one of the easiest platforms to use… as a customer. As a seller, the story is quite different. If you have ever listed a product on the Amazon marketplace, you know how frustrating it can be. Waiting 15 minutes for inventory updates to show, pictures not uploading correctly and cryptic error messages. These are problems you will run into constantly if you use Amazon’s selling platform. However, the worst experience is when you are trying to do something that’s non-standard. Today we will do run through one of these activities by creating a new fashion jewelry listing without a UPC.
The problem
Amazon expects you to list an item by looking for an existing universal identifier such as a UPC or their own Amazon identifier ASIN. They do this to provide a better experience to end users since it would reduce the number of repeat listings. This is great for customers but what about new items that do not have a UPC, like jewelry.
Amazon does allow items to be listed without a UPC but often an exemption is required. For some products, like unbranded jewelry, Amazon gives a blanket exception and allows you to list against an ASIN that they generate for you. However, at the time of this writing, the Amazon Seller web interface no longer lets you do that.
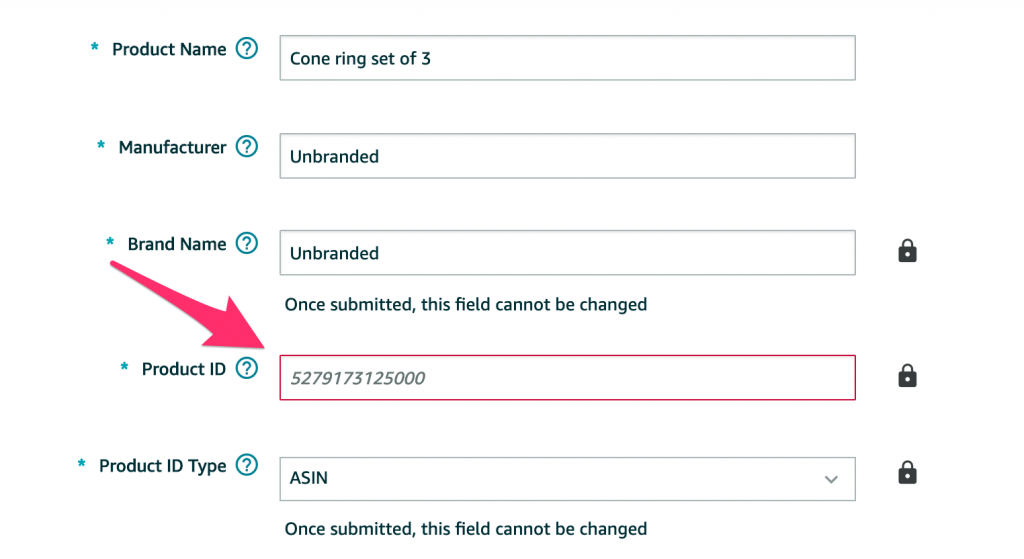
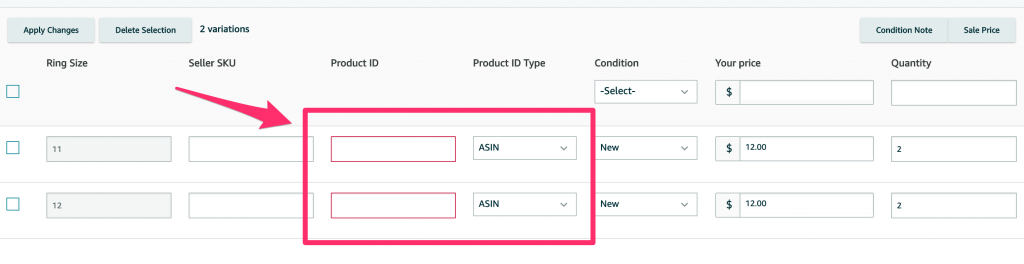
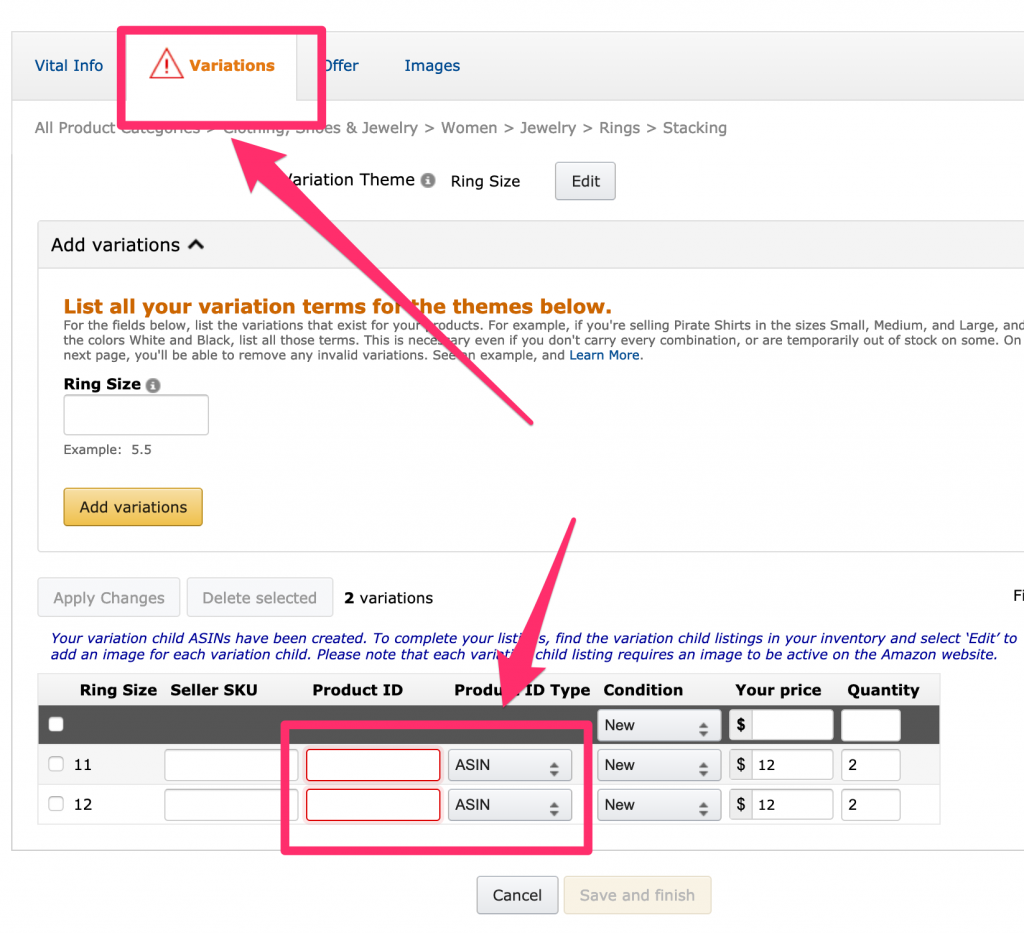
Trying to add an item without an existing ASIN does not allow you to save. The same problem occurs when trying to add a variation, which is all but necessary for items that require sizes such as jewelry.As long as a section up here stays red, you can’t save your new product.
In the past, when you listed an item, like jewelry, without a UPC, you can choose to use an ASIN and the system would generate an ASIN for you. You could then add the product under the newly generated ASIN. As you can see in the screenshot above, this is no longer true.
Even reverting back to the original interface also does not work.
You still have the option to return to the old interface. Still can’t save in the old interface.
So officially, you can still apply for an exemption or you can use a third party ASIN generator to get the ASIN to input into these forms, but that can be very costly and time-consuming.
The Workaround
Fortunately, we still have a workaround. We can still use upload templates to create new listings without having to use UPCs. Today we will walk through how to upload a new fashion ring listing with multiple size variations into the Amazon Marketplace using a template.
1. Download a template file
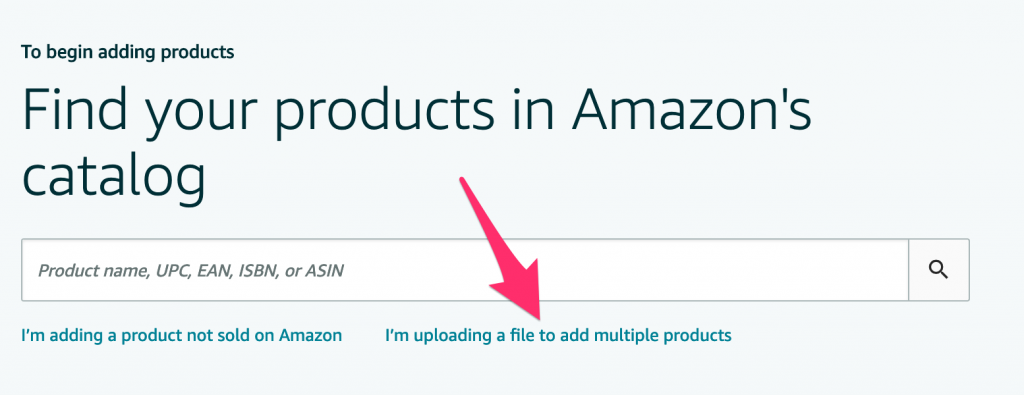
First, download the correct template from Seller Central.
Choose the appropriate category.
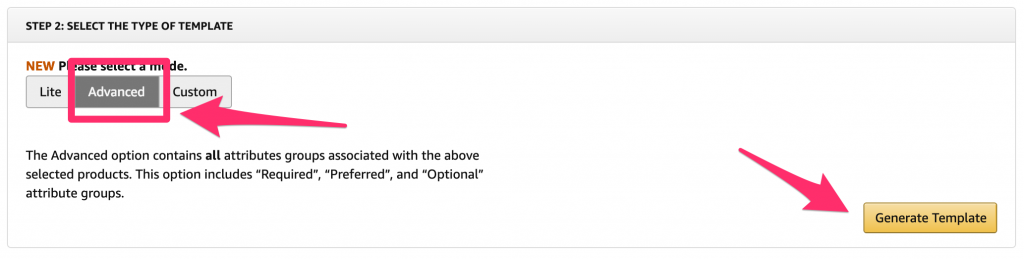
Since we are going to want to create a product with a size variation, make sure to select the “Advanced” template.
Choose the Advanced option if you are uploading a product with variations. If you do not have variations then you can choose the Lite option.
2. Fill in the necessary fields in the template
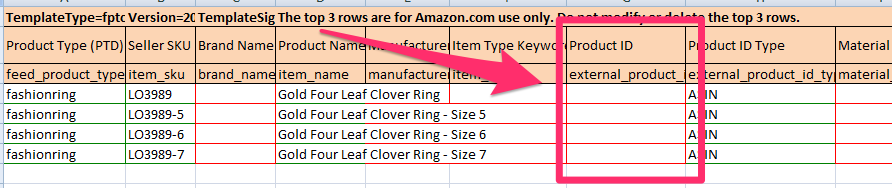
The first row will be the “parent” listing. The parent listing won’t have a price or quantity but the “child” listing underneath it will. In our case each child will be a different size variation.
Each child should have a different seller SKU. These can be anything you want since it will only be visible to you but it would be useful for you to name them so you can easily track your products. In this example, I will make each child SKU the parent SKU with the size appended at the end. You don’t have to have a different Product Name for each item, but it would be a good idea to add the size to each title to make it easier for customers differentiate your listings and for yourself when it is time to fulfill the item. Choose “ASIN” for the Product ID Type and leave the Product ID field blank.
You can leave this field blank. You can leave this field blank.
3. Add image links
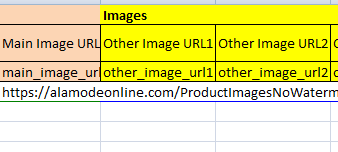
Be sure to add an image link in the Main Image URL field, even for the Parent listing.
The Main Image URL needs to be set for the Parent listing as well
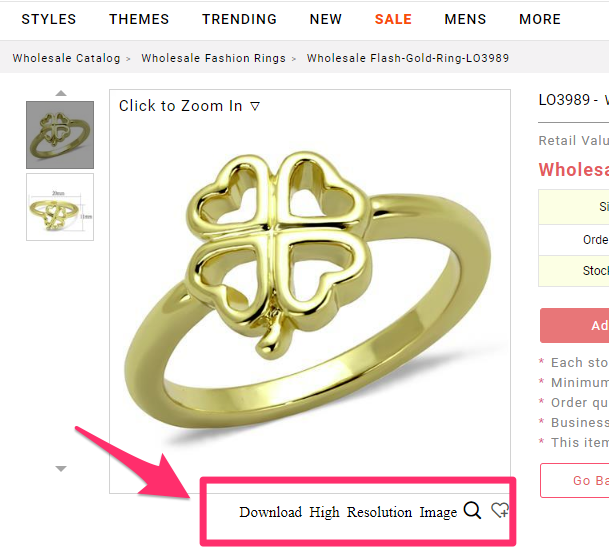
This URL should be a publicly accessible link, so if you are using Google Drive or Dropbox, make sure that the link has the proper permissions set. If you are uploading an Alamode product, you can find our image links on the product page. You can also find all image links in our inventory list.
Our product page links are publicly accessible so they can be used directly on the upload template.
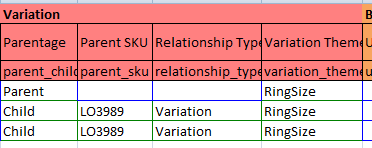
4. Fill in the parent child relationships
Not all fields need to be filled out, but make sure to fill in the “Variation” section and mark the first row as “Parent” and the following rows as “Child”. Each child will need a Parent SKU. In this case, the parent SKU will be the value of the “Seller SKU” field of the first row. Note that the Parent SKU and Relationship Type fields of the parent row should be left blank.
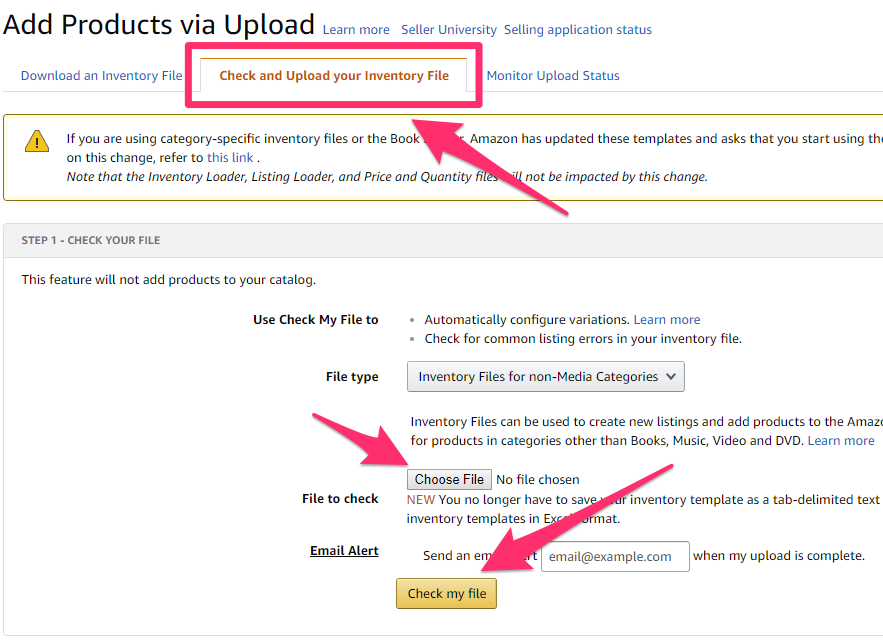
5. Check your file
After filling out any other optional fields, such as the bullet point descriptions, size, and quantity you can check your file. Although optional, it is recommended that you check your file for errors before you formally upload it. While this does add an extra step in your workflow, it is a lot easier to fix errors before your official upload than to try to fix errors after the fact.
It is recommended that you check your file before final submission.
The results of your check will be available on the next tab. It might take a few minutes to generate your results.
If you have a very large file, you might want to use the email alert feature to be monitored when the report is complete.
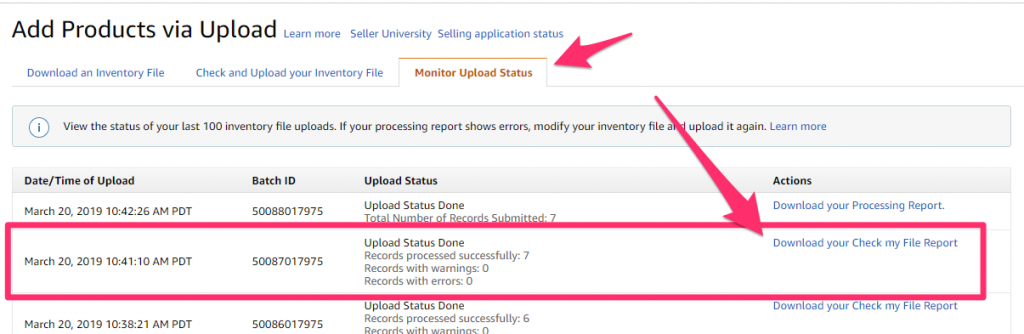
6. Upload your final file
Once everything looks good, perform your final upload in the section below the file check section on the first tab.
And that’s it! You can monitor the upload on the third tab. If there are no errors, the final tab will show you if your listings have uploaded successfully. Be aware that it can take up to 15 to 30 minutes before your listings show completely. Very often listings will appear without images. Give it a few minutes, if the images do not show up then you can edit the listing manually.
Conclusion
I hope this guide helps you list your products on Amazon more easily. If you have any questions, be sure to leave a comment below or send an email to service@alamodeonline.com and we will try to get back to you as soon as possible!
We are proud to introduce that Alamode Shopify App Beta. We have been hard at work trying to simplify your experience uploading and managing your online store. We know that a lot of our customers use Shopify as their content management system and it can be very time-consuming to add new products. With this app, you will be able to import new Alamode products into your Shopify store with a simple click, instead of laboriously downloading and uploading individual pictures and descriptions. Check out how easy adding new products can be in the animation below:
Add new products and images into Shopify with just one click!
Because the app is still in beta, it is not yet available to download from the Shopify App Store but it is still available to install. If you are interested in installing the beta into your store, email service@alamodeonline.com with your Shopify store name and we can get you set up!
This app is still in its early stages so please let us know if you would like to see any features in comments below.
As someone in the fashion jewelry industry, you hear this a lot. Are these CZs real Swarovski’s? I don’t want fake diamonds, I want a real Swarovski! For someone in the know, these questions are kind of nonsensical. But if you are asking these questions, it is not your fault! There is definitely a lot of misinformation in the fashion jewelry industry. So today we will figure out what Swarovski crystals really are and what you should know when buying them.
What are Swarovski Crystals?
Crystals, like Swarovski crystals, are also known as lead glass. As the name implies, lead glass is when lead replaces some of the content of a more typical glass you would find in everyday life. Adding lead creates a glass with an increased refractive index. For our purposes, you can describe a material’s refractive index as the ability of the material to bend light as light travels through it. This bending of light, along with the faceted cut faces, is what allows gems to sparkle and gives gems the “fire” that we all look for. It is no surprise that diamonds naturally have an extremely high refractive index. Swarovski crystals are faceted lead glass beads produced by the Swarovski company.
So are you trying to tell me that Swarovski crystals are just cut glass?
Well, they aren’t just any cut glass, but yes. By most definitions, Swarovski crystals, and all crystals used in jewelry, are basically a form of cut glass. But just because it is “only” cut glass doesn’t mean that it’s not special. By the same token, diamonds are just precisely cut minerals. With that said, we can answer one common question. Are Swarovski crystals real? Yes they are real. They are real lead glass. But more likely when a person asks this question, they are actually asking “are Swarovski crystals precious gems?”. In this case the answer is, no, they are not.
Swarovski crystals are non-precious lead glass meaning that the intrinsic value of the material is not very high. They do have a valuable brand name, however, which causes them to have higher prices compared to other crystal suppliers. At one point, Swarovski did have a noticeably higher quality crystal compared to other manufacturers. However, this is no longer the case and there are now many manufacturers of high-quality crystals. It is for this reason that we here at Alamode Fashion Jewelry tend not to use Swarovskis in our products. We still use them in some cases and we will certainly use them if a customer requests them, but in general, they do not look any better than any other crystal on the market.
Are Swarovski Crystals Worth it?
This leads us into our other common question: are Swarovski crystals worth it? The general rule of thumb for jewelry holds. If you think looks nice then it is worth it to you! But maybe you are asking: should I pay more for this ring with a Swarovski than this ring made with a different crystal? I would say the answer is if you value the Swarovski brand name, then yes it is worth it to be able to say it is a Swarovski. If you primarily value just the look of the product, then no since it will most likely look indistinguishable from less expensive crystals.
Swarovski Crystals VS Cubic Zirconias
Another common perception is that Swarovski crystals are “better” than cubic zirconias (CZ). Again, the answer to the question is up to interpretation. I think it could be argued that Swarovski has a better brand name compared to CZ which has a reputation for being cheap and fake. If the argument is that Swarovksi has better name recognition among the general population then yes, I think that you can say that Swarovski crystals are “better”. However if you are talking about objective looks, then I do not think you can say that Swarovski crystals are better than CZs. CZs have a higher refractive index meaning that they will sparkle more and have more “fire” compared to crystals. CZs and crystals can have comparable clarity but CZs are much harder so they will be much less likely to scratch compared to crystals. Often it is this scratched surface that makes stones look dull and “fake”.
Why use Crystals at all?
Now with all these reasons why crystals do not stack up to CZs, does that mean we should not use them at all? No! Crystals still have their place in fashion jewelry. In general, crystals are actually less expensive than CZs which makes them perfect for micro-pave settings. Micro-pave settings will usually use much smaller stones so each individual stone does not need the same level of clarity and detail of a larger stone. By using crystals versus CZs, the material cost of a piece can drop significantly without as significant of a drop in visual quality. Crystals are often also foil backed. This means that there is a reflective metallic foil added to the back of each crystal. Manufacturers add this foil to give the stone more fire at the expense of clarity. But this backing also means that crystals can be glued instead of manually set with prongs or other settings. Again, this is useful for very small stones where individually hand set stones would be too laborious and costly.
Conclusion
Hopefully, we were able to clear up some misconceptions about crystals and some of the stones used in fashion jewelry. It is true that Swarovski has a great brand name but that does not make it automatically better. While crystals might not be the best stone to use if visual quality is the main concern, they still have an important place in fashion jewelry.
What you need to know and what you can do about it.
In a letter on Friday, March 8, 2019, California State Treasurer Fiona Ma urged California Governor Gavin Newsom to help Amazon third-party sellers against an unjustified sales tax burden by the California Department of Tax and Fee Administration (CDTFA).
Background of the issue
Third party sellers that use Amazon’s FBA, or Fulfillment by Amazon, service have been able to reach more customers and have helped many sellers simplify their logistics and inventory management. However, using FBA comes with the cost of losing control over customer information, direct marketing, shipping, and returns. Since Amazon handles all payment, inventory, and logistics, third-party sellers fundamentally do not have control over where the product is stored and how the product is processed. In addition, third-party sellers do not have the ability to calculate or collect sales tax.
Even with all control belonging to Amazon, the CDTFA has taken the argument that the third party seller is the party responsible for collecting and paying California sales tax, not Amazon. By the reasoning of the CDTFA, if a product was stored by Amazon in a California warehouse, the seller is responsible for collecting California sales tax, even if the seller operates in another state and has no control over which warehouse Amazon uses. This situation has led the CDTFA to claim that out of state sellers that fail to collect California sales tax are “guilty of a felony” with each offense carrying a fine of $5000 to $20,000 or “imprisonment for 16 months, two years, or three years, or both”. The CDTFA has further claimed that out of state FBA sellers that have used Amazon’s California warehouses “may be guilty of a misdemeanor” if operating without a permit.
The CDTFA has already sent notices demanding some out of state Amazon Marketplace sellers to comply with CA sales tax and permit laws. Some sellers have even been told to pay back taxes going as far back as 8 years, which have amounted to tens of thousands of dollars or more.
Ma further argues against the practicality of the enforcement by noting that 38% of FBA sellers are located in China, well out of the reach of enforcement. All the while, the American small business owners who are within reach might be forced into bankruptcy if required to pay decade old back taxes.
What you can do to help
The most direct action available is the call the office of Gavin Newsom and urge him to help third-party sellers and to voice your support for Treasurer Fiona Ma. You can also participate in letter writing campaigns such as the campaign organized by the Online Merchant’s Guild. More information on the campaign as well as a template letter can be found at their website here.
Starting an Amazon Fashion Jewelry brand doesn’t have to be difficult!
There’s no getting around it, e-commerce is Amazon. Because of Amazon, a significant amount of retail consumers expect 2-day shipping and free returns. Some customers won’t even purchase anything online without 2-day shipping. If you are an Amazon Prime member, this situation has probably happened to you! Many times, when you are purchasing something off of Amazon, you are actually purchasing from a third-party Amazon Marketplace seller. In this guide, we will go through the high-level steps on getting started with selling on the Amazon marketplace. Then, click through the detail links to get the illustrated how-to for each step.
Key terms in this section:
Amazon Prime: The Amazon service where customers can receive, among other things, free 2-day shipping.
Fulfillment by Amazon (FBA):The shipping plan where you send your products to Amazon and they send it to the end customer. This is the most common way to receive Prime shipping
Merchant Fulfillment/ Fulfillment by Merchant:The shipping plan where the seller sends the product to the customer themselves without using Amazon’s fulfillment infrastructure.
Seller Fulfillment Prime:The option to fulfill 2-day shipping as the merchant and bypass Amazon’s fulfillment service
Buy Box: The box on the screen on the product page that has the buy button. Only one merchant can have the Buy Box at one time. Beating out other sellers to get the Buy Box is often called “winning the Buy Box”.
Purchase an Amazon Professional Selling Plan
There are two types of Amazon selling accounts, an Individual account, and a Professional account. The individual account is free but has an additional cost per unit when selling and has a monthly sales volume limit. The professional account has no limit but costs $39.99 a month. The idea is that individual accounts are targeted for regular people just selling things they have lying around the house, a few times a month. The professional account is geared toward business owners that want to establish a sales channel on Amazon. While it would be great to start with an individual account and then work up to a professional account, unbranded or self-branded jewelry is one of the restricted categories of products that requires a professional account. So in the journey of starting a jewelry brand on Amazon, a professional selling account is required.
2. List your product
While listing on other e-commerce platforms like eBay or Shopify is as straightforward as just adding pictures and descriptions to a page, Amazon has a few more steps. More specifically, Amazon is only expecting only one product page for every unique product. For example, say you’re listing a brand new iPhone X on eBay. You would simply create your own listing with your own descriptions and your own pictures and set your price. In search results, your listing would show up alongside thousands of other similar listings written by thousands of other people. Amazon does not allow these repeat listings. Instead, if you want to sell your iPhone X on the Amazon marketplace, you will find the existing master listing and simply list yourself as an available seller of that item. You will not be able to edit the listing unless you have “page control” and for a popular product like the iPhone X, it will likely be impossible for an individual seller to get that control. In our case, since we are establishing our own brand, we will not be looking to list as an available seller on an existing item but rather we will create a completely new listing with our own branding.
There are two main ways products are fulfilled to end consumers: merchant fulfillment or fulfillment by Amazon. Merchant fulfilled is probably what you are used to. In this plan, you physically box up your own item, buy shipping, add labels and send the package via UPS or another shipping company. Fulfillment by Amazon, more commonly referred to as FBA, is a little different. If your product is registered to be fulfilled using FBA, you will first send your product to Amazon and they store it in their warehouse. When the item is purchased, they will package it and send it to the customer without you having to do anything. The catch, of course, is that they will charge you an additional fee for the service. Also, note that FBA is the most common way for the customer to receive Amazon Prime shipping, Amazon’s free 2-day shipping plan. Yes, there are options for Seller Fulfilled Prime but that is a more advanced topic for another date.
While it may seem easier to first dip your toe into the Amazon Marketplace by using merchant fulfillment, there are many considerations that new sellers will have to contemplate when choosing these shipping options. Because you will have no reviews, it will be difficult to get visibility in the search rankings. Even worse, even when your product page shows up, you will not show up in the “Buy Box” on the right-hand side of the main product page. You will instead only be listed as an additional seller, even if you are the only seller! Using FBA can mitigate these problems to a certain extent. We will do a deep dive into this topic in our Amazon fulfillment section.
While this can be a lot of information to absorb, this is just a brief overview of the Amazon selling process. The process can be difficult but you will find it rewarding once you make that first sale and well on your way to building a sustainable fashion brand. If you have any questions, be sure to leave us a comment below and we will try to answer as soon as possible!